Setting up the appointment scheduler for your practice is completed from the Appointment Settings page. From one central location, you can set the default time increment that will display on your schedule; customize start and end times for each day of the week; and create appointment rooms and types.
- If you converted data from your previous system, review appointment types and make changes as needed.
- If you did not convert data, Neo includes default appointment types to get you started. Review the appointment types and make changes as needed.
For multi-branch practices. Appointment settings are managed per branch.
See FAQs: Appointments for answers to common questions.
Appointment hours
Select a time increment to determine the time slot duration on your appointment calendar. Then set up your practice’s business hours by day to ensure appointments are scheduled only within your operating hours.
Note: The time increment is also used to calculate default appointment durations by appointment type and when scheduling appointments. See Appointment Types at the end of this article to learn how to set up appointment durations by appointment type.
You will be able to review your updates to the open and close days and times before saving your changes.
Once saved, your changes are automatically reflected on your appointment calendar on the Schedule.
- Click your name in the menu bar. Then click Administration.
- Under System Admin, click Appointment Settings.
- For multi-branch practices only. Review or select a branch.
- Review or select a time increment from the Time Increment This is how your time slots will display on your appointment schedule.
IMPORTANT: If you change your time increments, any existing appointments on the schedule will not be automatically updated. For example, if you change from 10 mins to 15 mins, a 1 unit appointment will not fill the entire slot. You may choose to manually update them, as desired.
Tip: Select the number of minutes equal to your shortest appointment duration. For example, if your Vaccine Only appointments are 10 minutes, select 10 mins. - Review or update your practice hours.
a. Click on one or more day of week circles to deselect the day(s) from the current start and end times.
 - Opened
 - Closed
 - Opened for different hours
Note: Click a day again to select the day as open.
b. Click the start time and use the up and down hours to increase or decrease the hours and minutes to the desired time. Click the am or pm radio button, as needed. Repeat for the end time.
c. Click the green check to save.
Or click the red X to cancel.
d. Click Add Hours to set up hours for additional days. Repeat steps 5a – 5d, as needed.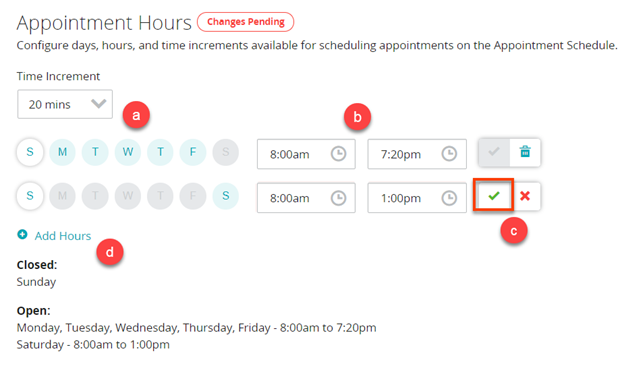
Appointment rooms
The order the rooms display on the Appointment Settings page is the order the rooms will display on the Schedule appointment calendar. You can reorder the rooms, as needed.
You also can edit room names or delete rooms.
Add an appointment room
- Click your name in the menu bar. Then click Administration.
- Under System Admin, click Appointment Settings.
- For multi-branch practices only. Review or select a branch.
- Click Add Room.
- Enter a name for the room. This is how the room name will display on the Schedule appointment calendar.
- Click the green check to save.
Or click the red X to cancel.
Note: The new appointment room is automatically added to the end of the list. - Repeat steps 4-6 for each additional room you need to add.
- To reorder a room, click the move icon
 to the left of the room name then drag the room to the desired position. Repeat as needed.
Note for multi-branch practices only. When you complete adding rooms for the selected branch, select the next branch from the Branch dropdown. Then repeat steps 4-6.
Edit, delete, or deactivate an appointment room
- Click your name in the menu bar. Then click Administration.
- Under System Admin, click Appointment Settings.
- To edit a room, click the menu button
 and select Edit. Then edit the room name and click the green check to save your changes.
 - To delete a room, click the menu button and select Delete. Then click OK; or click Cancel of you do not want to delete the room.
- To deactivate a room, click the toggle.
- To edit a room, click the menu button
Note: When you delete or deactivate a room, the room will be removed from the Schedule calendar. The deleted or deactivated room will display when you view a day where an appointment was scheduled in that room.
There must be at least one active room in Neo.
Appointment types
Appointment types let your staff quickly and easily determine the reason of the patient visit to your practice. Assign a default duration per appointment type to promote compliance and reduce time when scheduling appointment.
Note: Appointment times can be edited when scheduling patient appointments.
You can also edit, delete, or deactivate appointment types.
Add an appointment type
- Click your name in the menu bar. Then click Administration.
- Under System Admin, click Appointment Settings..
- Enter a name for the appointment type. For example, Sick Visit.
- Click the large color circle to select a color for this appointment type.
The color appears on the Schedule calendar to help you quickly identify appointment types. - Optional Click the small black circle to toggle the font color to white for this appointment type.
- Enter the number of time units for the appointment type.
Note: The duration is automatically calculated for you based on the number of units you enter multiplied by your default time increment entered in the Appointment Hours. For example, if your sick visits are typically 30 minutes and your time increments are 10 mins, enter 3 in the Unit box.
- Click the green check to save.
Or click the red X to cancel.
Edit, delete, or deactivate an appointment type
- Click your name in the menu bar. Then click Administration.
- Under System Admin, click Appointment Settings.
- To edit an appointment type, click the menu button and select Edit. Then edit the appointment type name, time units, color, or font color, and click the green check to save your changes.
- To delete a room, click the menu button and select Delete. Then click OK; or click Cancel of you do not want to delete the appointment type.
- To deactivate a room, click the toggle.
- To edit an appointment type, click the menu button
Note: When you delete or deactivate an appointment type, existing appointments that have that appointment type will not be changed.
There must be at least one active appointment type in Neo.